ShopDreamUp AI ArtDreamUp
Deviation Actions


Description
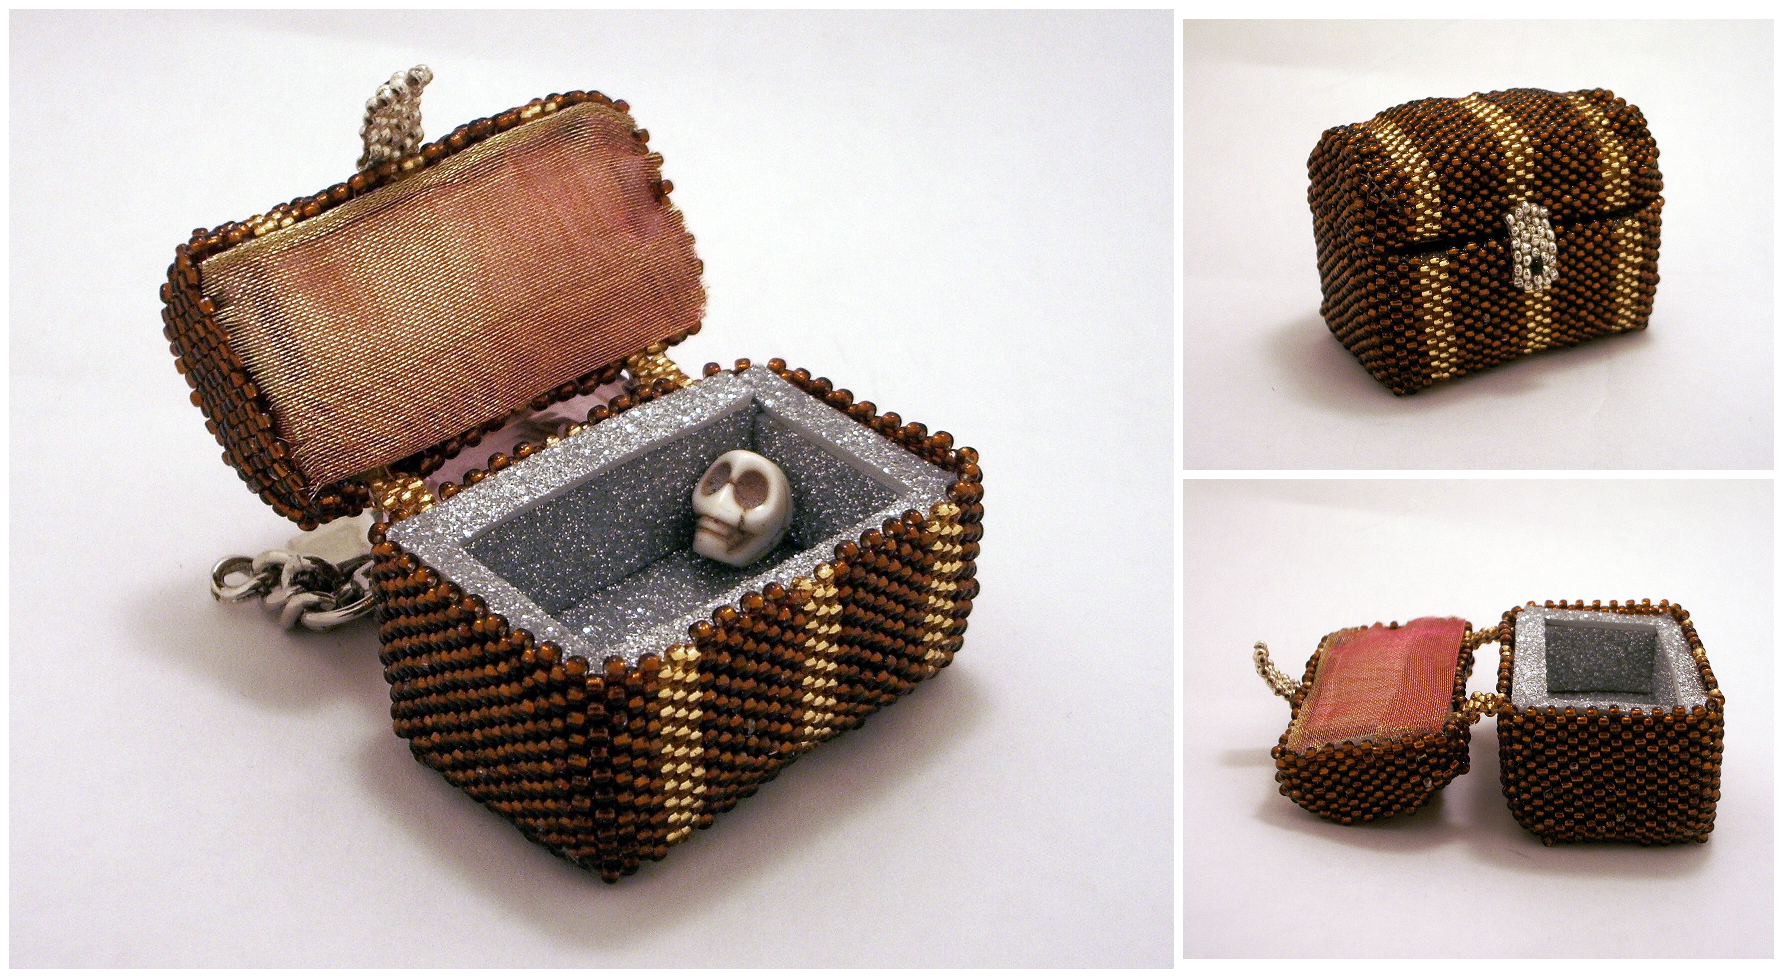
Edit 6/1/19 Updated image to remove yellow tint.
This is done from a pattern I purchased here: www.sova-enterprises.com/catal… As much as it pains me to say it... there are much better patterns and adaptations probably out there. I picked this pattern because it had the definite treasure chest look, but the pattern itself had two mistakes (one minor, one major) and the finished result was less than pleasing. I have to admit my own fault however - I chose to use round beads instead of the hex-cut/square-cut beads the pattern recommends.* Ignore that little chain in the back of the main photo - that's just to stabilize it for great shots. Forgot my coin again, sorry everybody.
This is made almost entirely out of beads. I say almost because I augmented it with some help from Mom to keep it stabilized. The entire chest itself is made from size 11 brown silver-lined, gold silver-lined, silver, and one black seed beads. It's threaded together with brown Japanese One G nylon. I was going to try out the KO thread on this piece but it hadn't arrived by the time I had started.
Almost 100% of the beading is peyote stitch, which, as I have now learned, is a most ridiculous and time consuming way to create a 3D object. Things don't thread together neatly, the weave is often too tight to push through cleanly, and doing the connecting hinges on this piece was ridiculous. I did the lock in brick stitch because flip I am tired of peyote stitch I mean seriously. It's not pictured but the entire bottom is also beaded.
Since I used round beads and think that was my main mistake here, the box wanted to become more of a strange basket. This was rather unacceptable, so I lined the bottom half of the box with cardboard. Then.. that looked pretty messy, all that cardboard and tape, so I glued some glitter foam inside of that and then lined the top with it to give it a treasure-y sparkly awesome pirate loot look.
The lid was another matter. The pattern itself advises the use of some suede to keep the top's shape in place. I don't happen to have any suede laying around, my apologies. So Mom and I devised a way to stabilize it that has managed to hold together pretty well. Don't look too close - you'll ruin the illusion - but what we did was craft a small frame for the inside of it from pipe cleaners, cut a wine cork in half to fill the inside of that, sewed that all into place to contain it, and then glued a shiny pretty piece of ribbon on top to hide all that mess. I'll have you know that the next treasure chest project will not be using this particular pattern of craziness.
Originally I was going to make a lot of little pretty things out of beads to go inside of it, like this beady skull from Mer-ryGoRound mer-rygoround.deviantart.com/a… but she didn't have a pattern for me to abuse. The next step was to add one of those little skull beads you've seen before pinkythepink.deviantart.com/ar…. I was going to do a tiny beaded sword with some mirror paper... but couldn't figure out how that would work without ruining my supply. My cousins were here last week and suggested I make a tiny map out of cross-stitch for him, but it was all wrapped up by the time they had. So perhaps soon I'll be crafting up one of those. Or... a tiny jar of dirt?! If I can ever find a supplier!
Colors: 4
Bead Sizes: 1
Size: 1 1/2 inches tall, 1/2 inch deep, 2 inches wide, 1 1/4 inches wide the other way
Time: 30 hours eff you peyote
*However, in case you do decide to purchase this pattern, be aware that the two mistakes are on the "Lid - Front, Sides, Back" in which she has made a mistake in coloring the pattern to show the three straps going all the way around, and on the "Lid Top" which is meant to zip along the Lid F/S/B easily but is missing/has gained a row of beads that makes this impossible. To correct this simply be aware of the coloring mistake on the first and add or remove a row of beads from the top of the "Lid Top" pattern. Also be aware that I'm not dissing the designer. She does great work and I do own a plentiful handful of her patterns, this one just wasn't my favorite.
Image size
1783x978px 3.54 MB
© 2012 - 2024 pinkythepink
Comments49
Join the community to add your comment. Already a deviant? Log In
Cute 